
Blogging is an activity that is more like expressing yourself through words. However, this is not all of it. The term ‘blog’ can refer to a personal space where an individual or a group of people can share their views or stories with the entire world. Some users create and update their blog as a fun activity, while others invest in it as a career or business opportunity. Regardless of what you aim to do with your blog, creating it in the best possible way is what’s important.
Now that you’ve reached this part of the blog, we assume you’re interested in creating a blog. One of the most favoured platforms to start a blog is undoubtedly Word Press. In this article, we will guide you through creating a fantastic and efficient WordPress blog.
Although many believe creating a WordPress blog can be scary, we believe creating a blog is a peanut. So let’s get started!
Why a WordPress Blog?
When we say Word Press is the most popular platform for blogging, we mean it. 42% of all the websites present on the internet use Word Press. The majority of the successful most blogs were also from Word Press. Moreover, Word Press is a 100% free platform. Since the platform is a self-hosted one, the user is not charged to use the forum.
However, you may require a domain (the name for your blog) and web hosting which manages your site. The name domain and web hosting together cost around $ 23/year. That indeed is a considerable amount. However, Bluehost manages to provide users with a free domain in a cost-efficient amount.
Kinds of WordPress Blogs

A WordPress blog can be created in two ways: –
- A self-hosted WordPress blog using Bluehost and WordPress.org. A self-hosted blog is costly. However, Bluehost offers a web host in a cost-efficient package that may be affordable for most newbie bloggers. By using WordPress.org, you have complete control over your blog, and there are no limitations. In addition, you can avail any plugins, themes, or services by using a self-hosted WordPress blog.
- A free WordPress blog using WordPress.com. By creating a blog directly on WordPress.com, you can start working on your blog 15 minutes from now. You would not be charged a single cent. However, you may not benefit from the perks of having complete control over your blog or monetization options.
Step-by-Step Guide to Create a WordPress.org Blog
Pros of a WordPress.org blog
- The blog stays under the complete control of the user.
- Using Customization and themes.
- Generate money using the blog.
In case you choose WordPress.org to create a self-hosted WordPress blog, here’s a step by step guide to help you make it. We have managed to show you the process by registering through Bluehost.com.
Go to Bluehost.com
You can begin by visiting the website for Bluehost. To get started, click on the green “Get Started Now” button.
Choosing the right plan to create a WordPress blog
Bluehost offers three kinds of plans. From a basic economic plan for newbies that provides a free domain and an SSL certificate to an unlimited website plan for commercial purposes, Bluehost offers it all.
We recommend the basic plan for beginners. However, you can update your hosting plan with more advanced ones once your WordPress blog receives more website traffic and audience.
Choose a Domain name
If you have never been to Word Press, you will have to create a domain name. After choosing the right plan for web hosting, you will be asked to input a name for your site. Input a name and choose an extension. Different domains include .net, .org and, .com to name some.
Bluehost will check for the availability of the domain name entered after you click next. If the name is available for use, the process can continue. However, if the domain name is not available, you may have to come up with another name. Bluehost may allow you to choose one later.
Registering an account
The website may then lead you to the registration form. Here, you will have to fill in your details and finalize the billing information. The form will confirm the web hosting plan and package that you chose.
Altering your hosting package or plan
If you decide to go for the plus and choice plus web hosting plans, you can alter your package. From 12 months to 36 months, the package may vary. You can add or remove features that you feel are unnecessary for your aim or WordPress blog launch. Moreover, you can always add these features back when you feel the need.
Creating a password
Once you have entered your billing information and details, you will be asked to set a password. Setting a password is the final stage of the registration process. The stronger the password, the better it is for security purposes. The same password is then used to verify your account. You would be asked to enter your password twice.
Account Creation Successful
Your new WordPress blog is now created! You can log in to your Bluehost account to continue the setup process after installing Word Press.
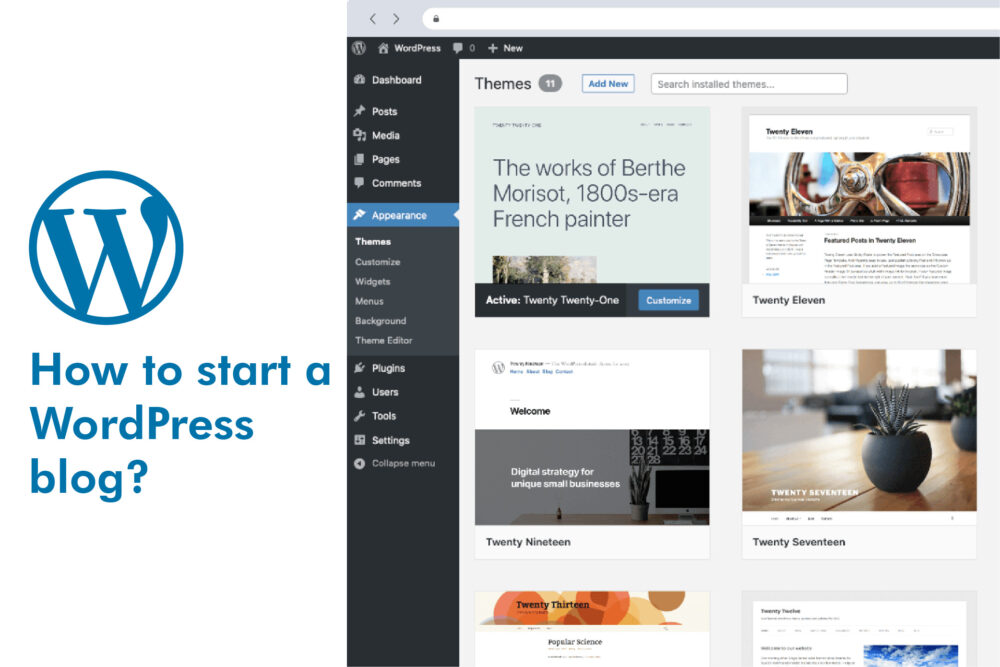
Choosing a theme for Word Press
Once you have managed to set up Word Press, you can now customize the appearance of your blog. Choosing the suitable theme for your WordPress blog is an essential step in the setup process. The appropriate theme can represent your brand and website in the best manner. Choose a theme that suits your website, and you are good to go! While some themes are free, Word Press also offers premium themes. These themes need to be purchased to use them.
Changing the theme is an easy job. First, go to your Word Press dashboard and click on the Appearance button. You may then click on Themes, after which an ‘Add new’ option may appear. Word Press offers 8,000+ free themes to choose from. You can preview each theme by clicking on it. When selecting a theme, it is essential to check the colours, design, and other such elements.
After finding the suitable theme, place your mouse on the theme, and an option to install it will pop up. Click it, and you can install the theme in a few minutes. After the installation, an activate button will appear. You can then activate the theme on your website. Each theme comes with built-in widgets and options.
After finalizing your theme and design, you can now create your first post for your WordPress blog. Happy publishing!
Step-by-Step Guide to Create a WordPress.com blog
Pros of a WordPress.com blog
- Easy for newbies.
- Free for basic blogging.
- Professional service.
Many users may not be interested in self-hosting or controlling their blog. For such users, a WordPress.com blog is the best choice. A WordPress.com blog will save you from taking care of or installing Word Press itself. Instead, it will simply offer you a platform to share your views or stories without controlling the domain.
You can register for a free blog by creating an account on WordPress.com. The process is quite simple and allows you to publish your first article only a few minutes after creating your blog. Creating a WordPress.com blog does not require any payments. It is a free platform that saves you from stressing about elements like the domain name and web host!
In case you chose WordPress.com to create a blog, here’s a step to step guide to help you make it.
Visit WordPress.com
You can start by going to WordPress.com. To create a Blog, click on the ‘Get Started’ button.
Choosing the type of website
The next step is choosing the type of website you want to create. You can choose from a blog, a website, an e-store, or a portfolio.
Selecting the right theme
Picking the suitable theme for your blog is a critical step in the setup process. The right theme can represent your brand and website in the best manner. Choose a theme that suits your website, and you are good to go!
Input the name
Please select a suitable name for your website and enter it to check for its availability.
Choosing the free option
You will be presented with four plans to create your blog. Choose the free option and get started by paying no amount!
Filling details
Account creation requires account details. You will be asked to put in an email address, a username, and a password.
Account Created
After clicking on the ‘Create account’ button, you now have your very own blog on Word Press! You can start working in the same minute by logging into your account.
You can continually update your free Word Press account. Although some individuals may feel like the services of a free version is enough for them, there are more plans you can explore. If you upgrade your blog, you can get services like extra space, a name domain, new themes, Customization, plugins, and much more. Choosing the best plan is what allows you to explore with your WordPress blog.
Conclusion
Even though there are multiple ways to start a WordPress blog, and your choice depends on whether you’re experienced or not or need a blog as a platform to express or monetize, we recommend choosing a self-hosted account. As stated above, a self-hosted version gives you complete control of your website and multiple monetization options. It also solves the problem of the amount of money charged by offering cost-efficient packages. The best part is you will know this is your blog, and you can do whatever you want with it!
Read also about WordPress Web Design: Reasons of Having a WordPress Developer.